Builder-grade homes are efficient, affordable, and predictable, which is great until we want personality. Adding character to a builder-grade home doesn’t require a full remodel or an endless budget. With thoughtful edits to architecture, surfaces, lighting, and styling, we can transform cookie-cutter rooms into spaces that feel curated, comfortable, and distinctly ours. In this guide we’ll walk through practical, cost-conscious strategies (and a few splurge moments worth saving for) so you can add charm, depth, and longevity to your home without losing sense or sanity.
Assess Your Home and Define Aesthetic Goals
Inventory Structural Bones and Visual Weaknesses
Before we change anything, we audit. Walk each room and note the bones that are working and the visual weaknesses that shout “builder-grade.” Typical strengths might include open floor plans, large closets, efficient kitchens. Weaknesses often include flat ceilings, hollow doors, standard trim, boxy windows, and generic lighting. We list:
- Architectural features that can be emphasized (fireplace, stairwell, large windows).
- Eyesores that need masking or correcting (awkward vents, mismatched trim, cheap laminate).
- Functional pain points (lack of storage, poor sightlines, noisy HVAC registers).
Make a simple two-column list: Keep/Enhance vs. Fix/Hide. That inventory becomes our improvement map.
Identify Architectural Styles and Inspiration
Character depends on a coherent style. We don’t have to commit to one historic period, but choosing an architectural direction, modern farmhouse, transitional, mid-century, Craftsman, or relaxed coastal, keeps decisions consistent. Collect three to five images that capture the feel we want: cabinetry, exterior color palettes, lighting, and trim. Use those as our north star.
While collecting inspiration, note recurring details: specific trim profiles, door styles, stair spindles, or metal finishes. These recurring cues are cheap guides for making disparate rooms read as a unified home.
Set Priorities, Budget, and Timeline
Not every change carries the same impact. We rank projects by ROI: curb upgrades and lighting changes often give immediate, visible returns: built-ins and flooring last longer but cost more. We define three priority tiers:
- Phase 1: High impact/low disruption (paint, hardware, light fixtures).
- Phase 2: Medium impact/moderate disruption (trim packages, flooring, built-ins).
- Phase 3: Major changes (window swaps, structural alterations).
Assign a ballpark budget and a timeline to each phase. Even if we don’t know exact numbers, a staged plan prevents overspending and helps us capture character incrementally.
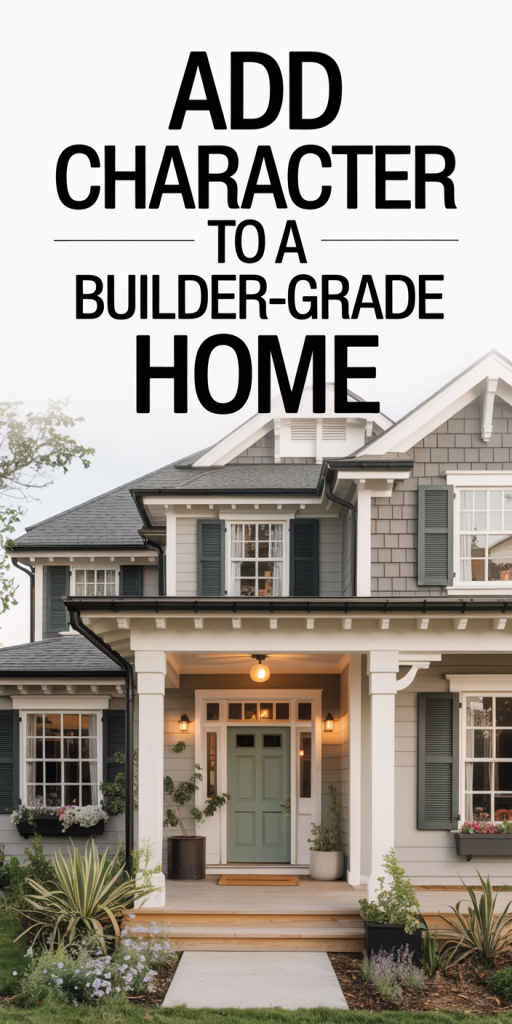
Boost Curb Appeal and Entry Moments
Simple Exterior Upgrades That Make A Big Impact
The exterior sets expectations, we want our house to suggest care and style before guests step inside. Small investments go a long way:
- Paint the front door a bold accent color. It’s inexpensive and shifts the whole mood.
- Replace or paint shutters (if applicable), and update mailbox and house numbers to match the chosen finish.
- Add window boxes with seasonal plantings to soften a bland facade.
- Upgrade landscaping: mulch, a couple of structural shrubs, and pathway lighting can make even modest yards feel intentional.
These curb moves add character without reshaping the house.
Designing An Inviting Entryway and Porch
The entry is our first interior impression. If there’s a porch, make it usable: add comfortable seating, layered rugs, and planters. For an interior foyer, we focus on function and gesture:
- A statement light fixture over the entry sets tone, a pendant or lantern with scale.
- A small console, mirror, and purposeful hooks or a bench create instant hospitality.
- Defining the entry with contrasting paint or a different flooring material (e.g., tile inset) tells visitors they’ve arrived somewhere curated.
We also consider sightlines from the door: what do guests see first? Tidy, framed views feel intentional.
Architectural Details That Improve First Impressions
Architectural details are the shorthand for character. We don’t have to rebuild the facade to add them. Consider:
- Adding simple trim around windows and doors to create shadow and depth.
- Attaching tapered columns or decorative brackets to a porch for instant Craftsman cues.
- Installing a modest roof overhang or awning above the entry to add proportion and shelter.
These moves are relatively small construction projects but they transform perceived quality and presence.
Add Character Through Trim, Millwork, and Built-Ins
Choosing Trim Profiles and Baseboards That Elevate Space
Trim has outsized influence for the cost. Replacing flimsy stock trim with taller baseboards, layered casing, and a thoughtful profile adds depth and age to space. We look for:
- Baseboards of 4–6 inches in most rooms: taller in rooms with 9-foot ceilings.
- A multi-piece casing for doors and windows instead of thin single-piece stock.
- Coordinating door trim and baseboards to maintain visual continuity.
Trim paint should be crisp and slightly glossy to read as intentional: matte trim can look underwhelming. Even swapping hardware on doors to solid knobs or levers reinforces the upgraded look.
Crown Molding, Ceiling Details, and Paneling Options
Crown molding and ceiling treatments change perceived ceiling height and scale. Options range from simple crown to coffered ceilings or beadboard panels:
- Install crown molding in formal rooms to create a finished, classic feel.
- A modest ceiling medallion around a light can feel charming without costing much.
- Add beadboard or shiplap to ceilings in porches, powder rooms, or kitchens for texture.
Paneling, from full-height wainscoting to board-and-batten, adds character to hallways and dining rooms. We use paneling to anchor furniture arrangements and protect walls in high-traffic areas.
Practical Built-In Ideas for Function and Flair
Built-ins are both practical and visually distinctive. For builder-grade homes, built-ins help avoid the generic “box” feel.
- Window seats with built-in storage turn a shallow nook into a destination.
- Flanking shelving units around a fireplace create intentional focus and display space.
- A built-in desk or mudroom cubbies in the entry maximize function and read as custom.
We recommend painted built-ins in a coordinating accent color, they’ll read built-in rather than bought. Even shallow shelving with integrated lighting can make a big design statement.
Transform Surfaces With Paint, Wallpaper, and Finishes
Color Strategies To Create Depth and Personality
Paint is the most democratic way to add character. We think in layers: base wall color, trim color, and accent hues. Strategies that work well:
- Use warm, slightly muted tones to make rooms feel lived-in rather than staged.
- Paint trim a different, complementary color instead of matching it to the walls, that adds depth.
- Consider darker tones on ceilings in cozy rooms to create intimacy: pale ceilings make spaces feel airier.
We test swatches large enough to read in different light and live with them for several days. Light changes everything: a color that reads warm in the afternoon might look cold at dusk.
Accent Walls, Wainscoting, and Decorative Plaster
Accent walls still work if used with purpose. Instead of painting a single wall the loudest color in the room, choose walls where architecture or furniture will sit against it. Alternatives to paint include:
- Wainscoting or board-and-batten on the lower third of a wall for classic proportion.
- Venetian or lime plaster in muted tones to add subtle sheen and texture in a powder room or entry.
- A fireplace surround finished in a contrasting material as the room’s focal point.
We avoid forcing an accent where nothing anchors it: the goal is to add character, not distraction.
When and How To Use Wallpaper and Textured Finishes
Wallpaper has made a comeback, but the trick is restraint. Use bold patterns in smaller or secondary spaces: powder rooms, closets, behind bookcases, or an accent bedroom wall. Textured finishes like grasscloth or grass weave add tactile warmth but can be pricier and require professional installation.
If we’re unsure, we test removable wallpaper first, it’s a low-risk way to try pattern without long-term commitment. For high-traffic spaces, choose washable, vinyl-backed options. Pattern scale matters: small rooms tolerate smaller prints: large rooms can handle large-scale motifs.
Upgrade Lighting to Add Warmth and Character
Layered Lighting: Ambient, Task, and Accent
Good lighting changes mood and reveals material quality. We design layers:
- Ambient lighting: ceiling fixtures or recessed cans provide general illumination.
- Task lighting: under-cabinet lights in the kitchen, bedside lamps, or desk lighting.
- Accent lighting: wall sconces, picture lights, and LED strips to highlight architecture.
We add dimmers wherever possible. Lighting that’s too bright or too flat makes spaces feel clinical: dimmable layers let us tailor atmosphere for cooking, cleaning, and relaxing.
Selecting Statement Fixtures and Proper Scale
A well-chosen chandelier or pendant can anchor a room and read like jewelry for the house. The key is scale:
- For dining tables, a fixture should be roughly 1/2 to 2/3 the width of the table and hang about 30–36 inches above the surface.
- In entryways, the fixture should balance the ceiling height, large houses can take bigger pieces.
- Groupings of pendants over kitchen islands should be coordinated in size and finish.
We pick fixtures that reflect our chosen style: aged brass for warm traditional looks, matte black for modern contrast, or glass and wood for transitional warmth.
Smart Lighting Tips and Practical Wiring Considerations
Smart bulbs and switches let us add functionality without rewiring. We use smart dimmers, scenes, and motion sensors in hallways. But when moving fixtures or adding built-ins with recessed lighting, we check wiring capacity and circuit loads. Simple rules:
- Replace bulbs with LED equivalents to cut heat and energy.
- When adding new circuits or hardwired fixtures, hire a licensed electrician: safety and code compliance aren’t optional.
- Where rewiring is impractical, use plug-in wall sconces or creative tabletop lamps to get the look without the install complexity.
Flooring, Rugs, and Textures That Ground A Room
Choosing Durable Flooring With Visual Interest
Flooring anchors a room. Builder-grade often means basic carpeting or narrow-stile engineered planks. Upgrading to wider-plank hardwood (or realistic, high-quality luxury vinyl plank) adds sophistication. Consider:
- Wide-plank wood or wood-look flooring in warm tones for continuity and a sense of age.
- Porcelain tile with wood or stone looks for wet areas that need durability.
- Durable carpets in bedrooms with a low, dense pile and neutral hue for longevity.
Choose floors with a grain or pattern that masks wear: this keeps character intact longer in busy households.
Rugs, Runners, And Layering For Warmth And Pattern
Rugs bring warmth, color, and acoustic dampening. They also help define seating areas in open plans. Tips:
- Size matters: living room rugs should sit under all front legs of furniture to unify the seating group.
- Layer a sisal or jute rug under a softer wool rug for texture contrast.
- Runners in hallways add color and protect flooring: choose low-profile weaves to avoid trips.
Rug patterns and colors are a great way to introduce accents from our inspiration palette without committing wall-to-wall.
Transition Strategies Between Rooms and Materials
Transitions are often overlooked but reveal age and care. Seams can look amateurish if not handled properly. We prefer:
- Consistent transition strips that match or complement flooring.
- Running the same flooring through main living areas to visually enlarge the space.
- Deliberate breaks where changes make sense, between kitchen tile and living wood, for example, with a threshold stone or metal strip for a tidy edge.
Thoughtful transitions read as professional and keep the eye moving smoothly through the home.
Swap Hardware, Plumbing, and Decorative Fixtures
Selecting Finishes That Coordinate Across Rooms
Small finishes tie a home together. We pick a 2–3 finish palette and repeat it across rooms: primary finish for large fixtures (door levers, cabinet pulls), secondary finish for lighting and plumbing, and an accent finish for shelving brackets or stair hardware. Common palettes include:
- Warm brass + matte black accents.
- Aged nickel + oil-rubbed bronze.
- Satin chrome + polished brass accents for eclectic mixes.
Consistency in finish elevates perceived quality and reduces visual clutter.
Affordable Hardware Upgrades That Feel Luxe
Replacing cabinet pulls, door levers, and faucets yields a high return. We look for solid metal pieces rather than plated-low-quality hardware: weight matters. Affordable upgrades:
- Swap all cabinet hardware in a single afternoon for instant cohesion.
- Replace hollow-core interior door knobs with lever sets that feel substantial.
- Add backplates to classic knobs for an intentional vintage touch.
Small changes are deceptively impactful because they’re at eye level and frequently used.
Small Plumbing And Cabinet Changes With Big Impact
In kitchens and baths, a few targeted swaps dramatize results:
- Change a faucet to a modern high-arc model with a pull-down sprayer.
- Add open shelving to display curated dishes or linens instead of inaccessible upper cabinets.
- Replace dated vanity hardware and update the mirror with a framed or backlit option.
These are projects that can be DIY for handy homeowners or quick hires for pros, either way they dramatically modernize function and style.
Furnishing, Styling, And Personal Details
Mixing Scales, Eras, And Textures For A Collected Look
A collected home looks like it evolved. We intentionally mix modern, vintage, and handmade pieces:
- Pair a contemporary sofa with vintage side tables and a handmade throw.
- Vary scale, large artwork above a low console, small ceramics on a wide shelf, to create visual rhythm.
- Mix textures: leather, linen, wood, metal, and natural fibers to add warmth and complexity.
We advise against buying everything at once. Build the look over time: it feels more authentic and prevents trend-driven clutter.
Art, Mirrors, And Accessories To Add Story And Depth
Art and objects tell stories. We choose pieces that reflect travel, family, or local makers:
- Create a gallery wall with a consistent framing strategy to unify mixed prints and photos.
- Use a large mirror to amplify light in darker rooms and make spaces feel larger.
- Group accessories in odd numbers on consoles and shelves for balanced compositions.
Lighting shelf vignettes and rotating seasonal items keeps displays fresh without overhaul.
Practical Styling Tips For Everyday Living And Maintenance
Character should be livable. Styling must consider storage and maintenance:
- Keep frequently used items on accessible, attractive trays or baskets to avoid surface clutter.
- Opt for washable slipcovers or performance fabrics on sofas if we have kids or pets.
- Maintain a “15-minute reset” routine: a quick sweep of countertops and straightening of pillows keeps the curated look intact.
We balance beauty with usefulness so our home feels inviting and real, not a showroom.
Plan, Budget, And Execute Without Overcommitting
Phased Project Planning And Prioritization
We recommend phasing projects to protect both budget and morale. Start with high-visibility, low-cost wins (paint, hardware, lighting) before committing to built-ins or new floors. A sample approach:
- Phase A (0–3 months): Paint, hardware swaps, light fixtures, rugs.
- Phase B (3–12 months): Trim upgrades, built-ins, flooring.
- Phase C (12+ months): Major structural changes or exterior remodels.
Phasing gives feedback on our aesthetic choices: if a paint color or fixture doesn’t feel right, change it before costly work begins.
Estimating Costs And Getting The Right Contractors
We get at least three quotes for any job over $1,500. Ask contractors for recent references and photos of comparable work. Cost estimates should break down materials, labor, and contingency. Typical ranges:
- Paint (interior): $1,500–$5,000 for a whole-house, depending on prep and quality.
- Trim and millwork: $2,000–$10,000 depending on scope.
- Flooring: $3–$12 per sq ft for materials and installation, wide variance by material.
We budget an additional 10–20% contingency for surprises, especially in older homes with hidden conditions.
DIY Vs. Professional Work: When To Call A Pro
We do a lot ourselves to save money, painting, installing hardware, some trim work, but we hire pros for:
- Structural changes, load-bearing work, or any project requiring permits.
- Electrical and plumbing rewiring: code compliance and safety are paramount.
- High-quality finish carpentry for seamless millwork.
If we’re learning a new skill, test it on a smaller area first. A few mistakes early on are cheaper than redoing large surfaces.
We also recommend scheduling work to minimize living disruption: stagger bedroom and living area renovations so we always have functional space.
Conclusion
Adding character to a builder-grade home is a process of deliberate choices rather than wholesale reinvention. By assessing our home, choosing a cohesive aesthetic, and sequencing projects, from curb appeal and trim upgrades to lighting, surfaces, and styling, we create a house that feels intentional and personal. Small, well-chosen interventions often deliver the greatest perceived value: a bold front door, layered lighting, better trim, and curated accessories. We don’t need to do everything at once: thoughtful phases, good contractors, and a consistent palette will let us transform a generic house into a home that reflects who we are and how we live.