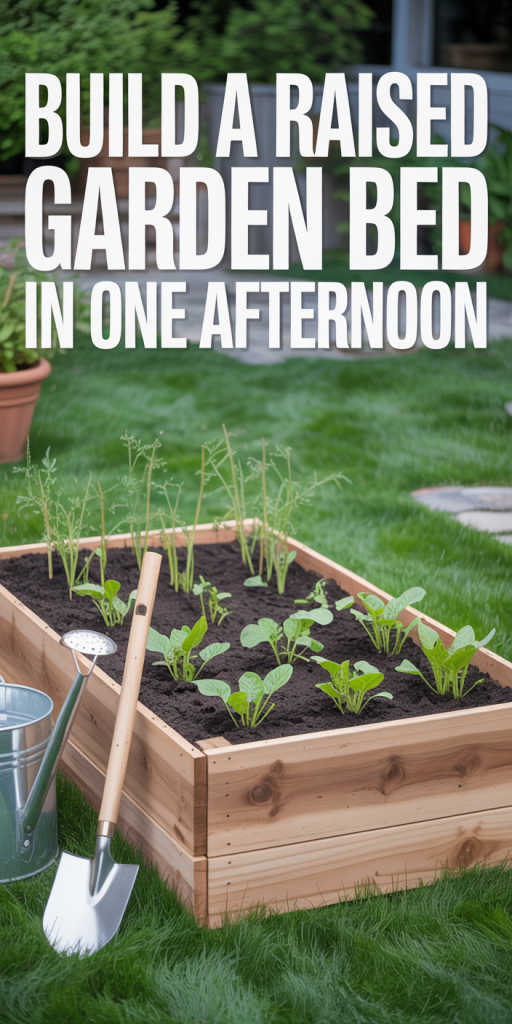
We’ve all looked at a bare patch of yard and pictured a productive raised garden bed full of tomatoes, herbs, or salad greens. The good news: building a raised garden bed doesn’t need to be a weekend-long project. With a little planning, the right materials, and two people, we can assemble a functional, attractive raised bed in a single afternoon. In this guide we walk through why raised beds are worth it, how to plan quickly, fast design options, a practical step-by-step build, and planting and early maintenance tips so that by evening you can have dirt and seedlings in place.
Why Choose a Raised Garden Bed
Benefits of Raised Beds
Raised garden beds are one of the quickest ways to improve growing conditions without reworking the entire yard. We get better soil structure, improved drainage, and earlier soil warming in spring, all of which help crops mature faster. Beds reduce soil compaction because we avoid walking on the growing area, and they let us customize soil mix for heavy feeders (like tomatoes) or shallow-rooted herbs.
Beyond the growing advantages, raised beds are ergonomic. A 12–18 inch high bed reduces bending and makes planting, weeding, and harvesting easier on our backs. They also help control pests and make it simpler to install covers, trellises, or drip irrigation.
When a Raised Bed Is the Best Option
Raised beds are especially useful when:
- Our native soil is poor, rocky, or compacted and we don’t want to amend the entire lawn.
- We need quick, contained garden space (rental yards, patios, or small backyards).
- Drainage is an issue, raised beds lift roots out of soggy ground.
- We want a neat, accessible design for accessible gardening or intensive planting methods like square-foot gardening.
If we have a large, fertile plot and prefer row cropping for big machinery, raised beds might be overkill. But for most home gardeners wanting fast results and easier maintenance, they’re an excellent choice.
Planning Before You Build
Choosing Size, Shape, and Location
First, we pick location: full sun (6–8 hours) for vegetables, partial shade for many herbs. Avoid low spots that collect water. Next, choose a size that fits our space and reach: a 4-foot width is common because we can reach the center from either side without stepping in. Length is flexible, 4, 6, or 8 feet are easy to handle in lumber lengths. Height typically ranges 8–18 inches: 12 inches is versatile for most vegetables, while 18 inches is better for deep-rooted crops or gardeners needing less bending.
Shape choices: rectangular beds are simplest and fastest. Circles or kidney shapes look nice but cost more time to cut and assemble. Consider stacking two 6- or 8-foot sections to create a longer bed while keeping individual pieces manageable during the afternoon build.
Deciding on Materials and Tools
Wood (cedar, redwood, or treated lumber alternatives), composite lumber, galvanized steel, concrete blocks, or recycled timbers are common choices. For an afternoon build we typically recommend: cedar (natural rot resistance) or untreated pine if we’re on a budget and expect to replace sooner. Avoid pressure-treated wood that uses older arsenic-based treatments: modern treated lumber is safer but still optional.
Other materials: hardware cloth for beneath the bed if voles are a concern, landscape fabric for a weed barrier, exterior screws, corner brackets, and soil. Tools: circular saw or have lumber pre-cut, drill/driver, level, tape measure, utility knife, and a helper, more on tools in the Tools Checklist section.
Estimating Soil Volume and Cost
To estimate soil needed: multiply length × width × height (in feet) to get cubic feet. For example, a 4′ × 8′ × 1′ bed = 32 cubic feet. One cubic yard equals 27 cubic feet, so that bed needs about 1.2 cubic yards. Soil costs vary: bulk topsoil or garden mix delivered by the yard is usually cheaper per cubic foot than prebagged soil.
Quick cost guide (approximate):
- Lumber (cedar) for a 4×8×12″ bed: $70–$150
- Screws, hardware: $10–$30
- Soil (bulk delivery): $60–$120 per cubic yard (depending on quality and region)
- Prebagged soil: $6–$12 per 0.75–1 cubic foot bag
Weigh budget vs. time, bulk delivery saves money and time if we have a place to tip the soil near the bed.
Quick Design Options for an Afternoon Build
Simple Rectangular Beds
The fastest option: a 4×8 rectangular bed made from four boards. We cut or buy four corner boards and two long sides. With two people we can assemble, level, and set in place quickly. This design is modular: later we can stack a second layer of boards to increase height.
Modular or Stackable Beds
Interlocking or stackable kits (either purchased or DIY using stacked boards) let us expand as time permits. Stackable boards are practical for an afternoon because each layer is lighter and easier to handle. We can start with one layer and add another later: crops will grow fine in shallower beds for a season.
No-Dig/Layered Beds
If we want to avoid cutting wood and want the simplest afternoon build, a no-dig bed is a great choice. We outline the area, lay down cardboard or newspaper to suppress weeds, then layer compost, shredded leaves, and topsoil. We can edge the bed with stones, logs, or landscape timbers. It’s quick, builds soil health fast, and bypasses heavy construction. Note: no-dig beds may require more soil volume to reach desired height but are extremely low-tech and fast.
Step-by-Step Build: Materials and Tools Setup
Materials Checklist With Alternatives
Our go-to materials for a fast, durable bed:
- Lumber: (4) 8-foot 2×6 cedar boards for a 4×8 bed. Alternative: 2×8 for greater height, or recycled pallets (inspect for chemical stamps).
- Screws: 3″ exterior-grade deck screws.
- Corner braces or 4×4 posts (optional) for extra stability.
- Weed barrier: landscape fabric or cardboard.
- Hardware cloth (1/4″ or 1/2″) if rodent protection is needed.
- Soil: bulk topsoil, compost, and/or professional garden mix.
Budget alternatives: concrete blocks, cinder blocks, or stacked untreated pallets. For a very quick build, galvanized steel raised beds or pre-made cedar kits are fastest but cost more.
Tools Checklist and Prep Tips
We’ll need:
- Drill/driver with screw bits
- Circular saw or pre-cut lumber
- Tape measure and carpenter’s square
- Level
- Hammer and nails (if chosen over screws)
- Utility knife (for cutting fabric/cardboard)
- Shovel, wheelbarrow, rake for soil
Prep tips: pre-cut lumber at the home center to save an hour. Pre-mix soil in a wheelbarrow if space allows. Lay out all hardware in one place so we don’t waste time searching.
Site Preparation in 30 Minutes
We can prep most sites in under 30 minutes:
- Clear vegetation and rocks from the chosen footprint.
- If installing directly on lawn, remove turf or flatten it and cover with cardboard to suppress regrowth.
- Check slope: if the ground slopes, plan to step the bed or dig one side down slightly: a small slope can be managed by tightening the longer side and using soil to level inside.
- Place the assembled frame where it will sit and mark corners. This lets us double-check fit and adjust before filling.
Step-by-Step Build: Construction (1–2 Hours)
Cutting and Assembling the Frame
Time estimate: 30–60 minutes with two people.
- Cut lumber (or use pre-cut): For a 4×8 bed using 2×6 boards, cut two boards to 8′ and two to 4′. If stacking or using 2×8, adjust accordingly.
- Lay out boards on a flat surface and pre-drill corner holes to prevent splitting.
- Attach boards at corners using 3″ exterior screws, two screws per corner spaced vertically. Use a carpenter’s square to ensure a 90° corner.
- If we want extra stiffness, screw a short 4×4 post inside each corner, or use metal corner brackets.
Anchoring and Leveling the Bed
Leveling is crucial for even water distribution. We’ll place the assembled frame in its final spot and check level across both width and length with the level. For uneven ground:
- Dig or add soil under low spots to level the base.
- Drive rebar or 12″ stakes through the sides or into the ground at corners to anchor the bed against wind and frost heave.
Make small adjustments now, it’s much harder once the bed is full of soil.
Adding Hardware Cloth, Liner, or Weed Barrier
If voles or gophers are a concern, staple hardware cloth to the underside of the frame and bury the edges 6–8 inches. We prefer 1/4″ or 1/2″ mesh in most regions.
Lay landscape fabric or cardboard inside if weed suppression is needed but skip tight liners that trap moisture unless necessary. Cardboard is biodegradable and encourages soil life: landscape fabric can last longer but can also impede decomposition over time. If drainage is a concern, add a 1–2″ layer of coarse gravel or broken pots at the bottom only if you have compacted soil beneath, otherwise, good soil and a slightly raised bed provide adequate drainage.
Filling the Bed Efficiently
Fast Soil Mix Recipes for Raised Beds
We want a light, fertile mix that drains well yet retains moisture. Two fast recipes we use:
- DIY Mix (fast, balanced): 40% screened topsoil + 40% compost + 20% coarse sand or perlite. This gives a good balance of structure and fertility.
- Mel’s Mix (popular for square-foot gardening): 1/3 blended compost, 1/3 peat moss (or coco coir as a sustainable substitute), 1/3 coarse vermiculite. This is very lightweight and fertile but costs more.
We prefer substituting coconut coir for peat to be more sustainable. If using bulk compost, we mix with topsoil to avoid too much nitrogen burn.
Layering for Drainage and Fertility
A time-saving layering approach:
- Optional: 1–2″ hardware cloth or gravel if pests/drainage are an issue.
- 2–4″ coarse material (coarse wood chips or shredded branches) for volume and aeration if we’re using expensive soil: this reduces soil needed but breaks down over time.
- Top with our chosen soil mix to the bed’s top.
Avoid filling the bottom with large branches that create long-term voids or uneven settling. For a quick afternoon fill, order bulk soil to the nearest point and wheelbarrow it in.
Saving Time With Prebagged Soil or Bulk Delivery
Prebagged soil is convenient but heavy and labor-intensive to move. If we can get bulk delivery, we can tip soil near the bed and use a shovel/wheelbarrow to fill the bed in under an hour for a 4×8. Many suppliers will deliver to the driveway for modest fees, it’s often worth the cost to save several hours of hauling bags.
Planting Immediately After Build
What to Plant Right Away (Fast-Growing Options)
If we want instant gratification, plant fast-growing crops that’ll show progress in weeks:
- Leafy greens: lettuce, arugula, spinach, and mustard greens, they germinate quickly and tolerate cooler soil.
- Radishes: one of the quickest crops (3–4 weeks to harvest for many varieties).
- Herbs: cilantro, dill, basil (depending on season), and chives establish quickly.
- Bush beans and baby carrots (if soil is loose enough).
Calendar note: plant according to local last frost dates and microclimate. Cool-season crops can go in earlier: warm-season crops (tomatoes, peppers) wait until soil and air warm sufficiently.
Planting Layouts for Small Raised Beds
Square-foot gardening layouts are ideal for small beds. In a 4×8 bed, we can section into 32 1×1-foot squares and plant:
- 9 lettuce per square, or
- 16 radishes per square, or
- 1 tomato or pepper per 4–9 squares depending on variety and stakes.
When planting seedlings, leave room for vertical supports, place tomatoes and trellises at the back or center and quick greens in front.
Watering and Mulching After Planting
Right after planting, water gently but thoroughly to settle soil around roots. For an afternoon build and planting session, consider installing a simple soaker hose or dripline to save time on daily watering.
Mulch with straw, shredded leaves, or compost to reduce evaporation and suppress weeds. Keep mulch 1–2″ away from plant stems to reduce rot. Mulching also helps regulate soil temperature, which is especially useful for newly filled beds where soil may dry faster than surrounding ground.
Maintenance Tips in the First Weeks
Watering Schedule and Moisture Checks
Newly built raised beds dry out faster than in-ground beds, especially in warm weather. For the first two weeks, we check moisture daily. Insert a finger 2–3 inches into the soil: it should feel moist but not waterlogged. Adjust watering frequency accordingly.
If we used a fast-draining mix, water more often but in smaller amounts. Drip irrigation on a timer is the best low-effort approach, set short cycles once or twice daily at first, then reduce as roots establish.
Fertilizing and Soil Care
If we used a compost-rich mix, additional fertilization in the first month might not be necessary. But for heavily feeding crops like tomatoes, side-dress with an all-purpose organic fertilizer or compost tea 3–4 weeks after planting.
Top up with compost at the start of each season. Raised bed soil is finite: plan to add a 1–3″ layer of compost yearly to maintain fertility.
Troubleshooting Common Early Problems
- Poor germination: check seed depth and moisture. Seeds need consistent moisture: a light daily misting can help.
- Rapid drying: add mulch and check for wind exposure: move to shade cloth if seedlings are wilting in afternoon heat.
- Pests: use row covers, collars for young transplants, or organic repellents as needed. Early detection is key, inspect leaves weekly.
Time-Saving Tips and Common Mistakes to Avoid
Two-Person Workflow to Finish in an Afternoon
With two of us, we can race through the project calmly:
- Person A measures and cuts (or fetches pre-cut pieces): Person B pre-drills and positions boards.
- Assemble frame on a flat surface while Person B prepares the site.
- One person moves soil with the wheelbarrow while the other steadies the frame and levels.
Divide tasks to keep momentum. Pre-cut lumber at the store or order pre-cut kits if we’re short on power tools.
Mistakes That Add Hours and How to Prevent Them
- Not pre-cutting lumber: buying long boards and cutting on site adds time. Have the store cut or cut the night before.
- Underestimating soil volume: running out of soil in the middle of filling wastes time. Calculate volume and order a bit extra.
- Skipping leveling: an unleveled bed will take longer to correct once filled. Level before filling.
- Using improper fasteners: cheap nails or interior screws will fail. Use exterior-grade screws from the start.
Avoid these mistakes and we’ll be planting by late afternoon rather than reworking the bed the next day.
Budget Alternatives and Upgrades
Low-Cost Material Substitutes
If we’re watching costs, these substitutes work well:
- Reclaimed pallets: disassemble and use boards, but inspect for chemical stamps (avoid “HT” is good: avoid unknown treatments).
- Cinder blocks or stacked bricks: inexpensive and instantly usable, we can fill the cores with soil or plants.
- Logs or natural stone: a rustic look and low-cost if materials are available.
Using cardboard as an internal liner reduces weed pressure and cuts cost compared to fabric.
Durability Upgrades Worth the Investment
If we want the bed to last years without maintenance:
- Choose rot-resistant wood (cedar or redwood) or composite lumber.
- Use stainless or coated screws to resist corrosion.
- Add metal corner brackets and interior posts for extra strength.
- Install an attached trellis system or drip irrigation during build to avoid later retrofits.
Spending a bit more up front saves labor and replacement costs later, often worth it if we plan on the bed lasting 5–10+ years.
Conclusion
We can turn a bare patch into a productive raised garden bed in one afternoon when we plan, use straightforward designs, and split tasks. Start with a modest 4×8 bed, pick materials that match our budget and timeline, and focus on leveling, pest prevention, and a good soil mix. With the bed built and filled, planting fast-growing crops and installing a simple irrigation solution will get us growing immediately. In short: with two people, basic tools, and a prioritized plan, our afternoon can end with seedlings in place and a clear path to a productive season.