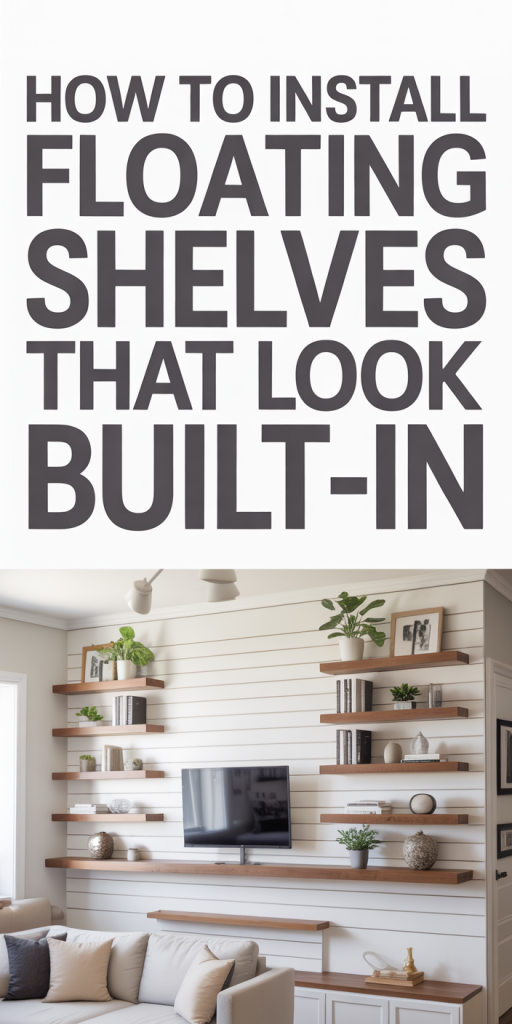
Floating shelves that read as built-in add a clean, custom look to any room without the cost or permanence of cabinetry. We’ll walk through a practical, step-by-step approach so your shelves sit flush, hold weight, and visually integrate with your wall. This guide covers planning, tools, cutting, several installation methods (hidden brackets, cleats, anchors), finishing techniques, troubleshooting, styling, and maintenance. We assume basic DIY skills and a willingness to measure carefully, that’s where the difference between “floating” and “built-in” happens.
Plan the Built-In Look Before You Start
Choose the Right Shelf Style and Material
First we decide how “built-in” we want the final look to read. Simpler, minimalist shelves often use a single-thickness plank with concealed hardware: more built-in appearances come from thicker shelves, return edges (sides that wrap into the wall), or full-height back panels.
Material choices matter for both appearance and load capacity. Popular, reliable options:
- Solid hardwood (oak, maple, walnut): strong, can be routed for concealed brackets, finishes beautifully, good for visible, high-end built-in looks.
- Plywood with hardwood veneer: stable, less prone to warping, easier to get large widths without seams.
- MDF or engineered wood: smooth and paint-ready: great when we plan to paint shelves the same color as the wall for a camouflaged look.
- Metal or laminate options: modern aesthetic but require different bracket/joinery considerations.
We match material to the room’s style and expected load. For books and heavy displays, prioritize strength (solid wood or high-grade plywood) and a robust hidden-mount system.
Measure, Layout, and Visualize Placement
Good planning prevents ugly surprises. We start by measuring the wall height and width, noting electrical outlets, light switches, windows, and baseboards. Sketch the wall to scale or use a simple tape-and-painter’s-tape mockup on the wall to visualize shelf placement and spacing.
Rules of thumb:
- For standard decorative shelves, space vertical shelves 10–14 inches apart for books and 6–12 inches for decor pieces.
- Keep a minimum of 2–3 inches of clearance above baseboards unless building a full-height inset.
- Align shelves with architectural elements, window sills, door frames, or picture rails, for a built-in feeling.
We also test visually by holding the shelf at the proposed height (or using cardboard cutouts). It’s surprising how often a mockup shows we need slightly different spacing or offsets.
Assess Wall Structure and Weight Requirements
Before buying hardware, we examine the wall’s construction. Typical US interiors have 2×4 studs spaced 16″ on center behind 1/2″ or 5/8″ drywall. But older homes can vary, so we use a stud finder and, if possible, probe gently if we suspect plaster and lathe or thicker walls.
Calculate expected load. For example, a 36″ long oak shelf holding books might need to support 60–100 lbs: heavy displays or plants will increase that.
Prioritize stud-mounted supports for heavy loads. If studs aren’t where we want them, plan for a ledger, French cleat, or use heavy-duty anchors rated for shear load. Always check percent-of-load ratings: many toggle bolts excel in pull-out but are weaker in shear.
We make a plan: how many shelves, lengths, whether they’ll be continuous across studs, and what bracket system will meet both our aesthetic and load needs.
Gather Tools, Hardware, and Supplies
Essential Tools and Safety Gear
We gather everything before we start, nothing slows momentum like searching for a missing bit. Our basic toolkit looks like this:
- Stud finder (preferably one that detects live wiring)
- Level (24″ or longer for longer shelves)
- Tape measure and pencil
- Drill with a set of bits (including masonry bits if needed)
- Driver bits and socket set
- Countersink bit or router (for concealing bracket plates)
- Jigsaw or circular saw for cutting shelves: table saw if available for straighter edges
- Clamps (bar clamps or pipe clamps)
- Shim set and a small hammer or mallet
- Caulking gun, paintbrushes/rollers, sandpaper (120–220 grit)
- Safety gear: eye protection, dust mask or respirator, and hearing protection
We also recommend a helper for longer shelves, one person holds while the other fastens.
Hardware Options and When To Use Each
Selecting the right hardware is central to both safety and aesthetics. Options include:
- Concealed metal shelf brackets (floating shelf hardware): great for minimal, true floating appearance. Choose heavy-duty versions with long steel rods sized to shelf depth.
- French cleat system: versatile, extremely strong, and forgiving of minor leveling errors. Works well for wide, heavy shelves or when mounting across multiple studs.
- Ledger with face-cleating and trim: provides full support across the wall and makes integration with back panels easier, useful when you want a built-in box effect.
- Anchors and toggle bolts: good for light to moderate loads where studs aren’t available. Use nylon or metal toggles rated for the expected shear load.
- Pocket-screw joinery and internal reinforcements: useful if building multi-piece shelves or joining seams invisibly.
We choose hardware that balances load rating and concealment. If in doubt, overspec the hardware, it’s cheap insurance.
Preparing the Wall for a Seamless Result
Marking Studs, Levels, and Layout Lines
Accurate layout is where a built-in look begins. We use the stud finder and then verify with a small pilot hole or thin nail: stud finders can misread wiring or pipes. Once we mark studs, we draw a level line for the shelf’s front edge with a long level or a laser level if available.
Key steps:
- Measure and mark the desired height from the floor at several points.
- Snap a chalk or pencil line between those points, this becomes our visual guide for keeping shelves perfectly aligned.
- Mark stud centers and measure their distance relative to shelf edges so we can plan bracket positioning.
If we plan multiple shelves, we stack marks vertically using a story pole (a scrap piece of 1×2 cut to the distance between shelves). This saves repeated measurements and keeps spacing consistent.
Repairing and Reinforcing Drywall Where Needed
If the drywall is damaged, we repair before mounting a finished shelf. A few common scenarios and our fixes:
- Small holes or dents: use lightweight spackle, sand smooth, prime, and paint after installation.
- Weak or crumbly drywall: remove the damaged section and install a plywood backing or blocking between studs. This gives the shelf hardware a solid substrate to bite into.
- No studs at the desired location: we’ll fasten a horizontal ledger or plywood strip directly to studs spanning the intended shelf line. This creates a continuous, reinforced mounting surface behind the finished wall area.
When we plan to recess shelves slightly into the drywall for a flush look, we may need to cut drywall away and install backing cleats so the shelf sits partially within the wall cavity. Always check for wires and plumbing before cutting: use a wire detector and, if uncertain, consult a pro.
Cutting and Finishing Shelf Pieces for a Built-In Fit
Material Cutting, Joining, and Edge Treatments
Precision in cutting and joining is where a shelf looks custom instead of DIY. We cut longer boards on a table saw for straight, repeatable edges. For visible edges, we recommend ripping veneer-faced plywood and then banding the edges with solid wood or iron-on edge banding for a seamless grain match.
Joinery tips:
- For long spans, glue and biscuit or domino-join multiple plywood panels to avoid visible seams and increase rigidity.
- Use pocket screws on the underside where possible to hide fasteners: countersink and plug visible screw holes when unavoidable.
- Pre-finish the underside and undersides’ edges slightly, finishing before installation reduces the chance of drips or missed spots once mounted.
Edge treatments:
- Round over or chamfer edges lightly to mimic factory shelves and prevent chipping.
- For a built-in look, we sometimes rout a small 1/8″ rabbet on the back edge so the shelf seats against the wall squarely.
Creating a Recessed or Flush Edge for a Custom Fit
To make shelves sit flush, we create returns or a small recessed slot on the shelf back or the wall.
Options:
- Rebated back: route a shallow rabbet (usually 1/4″ deep) along the rear of the shelf so the drywall lip overlaps the shelf slightly after installation, this conceals any gap.
- Inset installation: if the wall cavity allows, we notch out drywall and install the shelf so it recesses into the wall slightly. This gives a true built-in look but requires more demolition and backing work.
- Trim returns: add narrow side returns (small strips of matching material) that wrap the shelf’s ends into the wall plane, disguising any visible bracket seam.
Test-fit everything dry before finishing. Small adjustments with a sander or plane at this stage save headaches later.
Installation Methods: Hidden Brackets, Cleats, and Anchors
Using Concealed Metal Brackets for True Floating Shelves
Concealed brackets are classic for true floating shelves. These brackets typically consist of a flat plate that mounts to studs and a steel rod that slides into a hole bored into the shelf.
Our approach:
- Transfer stud locations to the inside of the shelf (or ledger) and mark bracket heights precisely using a level.
- Drill appropriately sized holes in the shelf back, holes must be straight and deep enough for full rod insertion. A drill press or guide ensures perpendicular holes.
- Mount the bracket plates into studs using 3″ screws, ensuring they’re perfectly level and plumb.
- Slide the shelf onto the rods and secure from the underside with screws or set screws in the bracket, depending on the design.
Concealed brackets give a clean look but require strong studs and precise boring. If the shelf is deeper than the bracket rod, add an internal cleat to distribute load.
Building and Installing a French Cleat System for Heavy Loads
French cleats are forgiving and strong, ideal when we expect heavy loads or need easy removal.
Steps:
- Cut a 45° cleat pair: one half attaches to the wall (secure into studs) and the matching half attaches to the back of the shelf or a plywood back panel.
- Fasten the wall cleat across at least two studs and confirm level.
- Hang the shelf cleat into the wall cleat, this creates immediate support across the entire cleat length.
This system spreads load along the wall and minimizes point-load stress. We often combine a French cleat with screws through the shelf back into studs for final security.
Anchors, Toggle Bolts, and Alternatives for Non-Stud Walls
When studs aren’t available where we want the shelf, we use rated anchors:
- Plastic or metal expansion anchors: fine for light loads (small decor items).
- Toggle bolts: better for moderate loads: they flip open behind the drywall to distribute load.
- Molly bolts: create a strong anchor inside the drywall cavity, good for medium loads.
- Heavy-duty wall anchors (sleeve anchors or chemical anchors): for masonry walls, use masonry-rated anchors and drill with a masonry bit.
We always consult the anchor’s load chart and use multiple anchors along the shelf span rather than relying on a single center anchor.
How To Install Shelf-Back Panels or Inset Supports for a Built-In Seam
If we want a truly seamless built-in look, we install a thin plywood back panel that spans the shelf line. This does two things: it hides hardware and creates a continuous plane with the wall.
Installation steps:
- Fasten blocking or plywood backing between studs flush with the wall surface where the shelf will sit.
- Attach the shelf’s back panel to that backing so the outer face of the panel is flush with the wall.
- Mount shelves to the backing or integrate the shelf so its top and bottom meet the panel flush.
Inset supports: for partial recessing, we build a small box frame that sits inside a drywall opening and supports the shelf from within. This reads very built-in but requires careful demolition and framing.
Finishing Techniques to Make Shelves Look Built-In
Caulking, Seam Filling, and Feathering Paint Transitions
Finishing transforms a competent install into a convincing built-in. We begin by filling seams where the shelf meets the wall with paintable acrylic latex caulk. For gaps larger than 1/8″, we use a backer rod first, then caulk.
Feathering paint transitions helps the shelf disappear into the wall. Steps:
- Prime exposed raw edges and any repaired drywall.
- Apply caulk along the shelf-to-wall joint, smooth with a wet finger or caulking tool, and wipe away excess.
- Lightly sand any uneven caulk after it cures, and apply primer over the caulk to ensure paint adhesion.
- When painting, extend the wall color slightly onto the shelf face (or vice versa) to blend the plane.
We use a high-quality paint and a small roller for consistent texture. Semi-gloss for shelf faces resists scuffs: flat or eggshell for surrounding walls helps mask imperfections, balance depends on aesthetic priorities.
Adding Trim, Return Edges, or Back Panels for Depth and Continuity
Trim can make a simple shelf look purpose-built. Typical trim additions:
- Small crown or quarter round under the shelf to hide the seam and cast a shadow line.
- Return edges (narrow strips) that wrap the shelf ends into the wall plane for an inset appearance.
- Full back panels painted to the same color as the wall extend from the shelf to the floor or ceiling for cabinetry-style built-ins.
We router matching reveal grooves or add rabbeted returns to coordinate grain direction so trim reads as one piece rather than applied afterward.
Color, Texture, and Paint Tricks to Blend Shelves With Walls
To make shelves read as built-in, color and texture choices are critical:
- Paint shelves the exact wall color for near-invisibility, use the same sheen for best blending.
- If shelves are wood and we want a subtle contrast, stain them slightly darker than the wall tone and use a matte finish on the wall with satin on the wood to create depth without breaking the built-in illusion.
- Use a color continuation technique: paint the shelves the wall color and give the inside underside a slightly different tone to suggest depth while maintaining unity.
We test paint samples in different lighting conditions, built-in effects depend heavily on light and shadow.
Common Problems, Troubleshooting, and How To Avoid Them
Preventing Sag, Racking, and Uneven Shelves
Sag and racking usually come down to under-spec hardware or insufficient support. Prevent problems by:
- Using brackets or cleats rated for more than the anticipated load.
- Supporting long spans with intermediate supports every 30–36″ for wood shelves: reduce spacing for softer materials.
- Ensuring the shelf is secured into studs or into a solid backing rather than relying solely on anchors.
We also make sure the shelf material is stiff: thicker stock or a stiff substrate like plywood resists sag better than a single thin plank.
Fixing Misaligned or Wobbly Shelves Post-Installation
If a shelf is slightly off-level, we first try adjusting set screws on the bracket. If that doesn’t help:
- Loosen mount screws, shim the bracket with thin plastic shims where needed, and retighten.
- For wobbly shelves, add a discreet screw through the bottom of the shelf into the bracket plate or backing: countersink the screw and fill the hole with a wood plug for a hidden repair.
- If the shelf pulls away from the wall, remove it and check for stripped screw holes, replace with longer screws or install a plywood backing across studs and remount.
For more serious alignment issues, uninstalling and re-drilling precise mounting points is often faster than trying to correct crooked hardware in place.
Load Limits, Safety Checks, and Long-Term Stability Tips
We always test new shelves under incremental loads. Start light and gradually add weight while checking for deflection and sound changes (squeaks). Periodically:
- Inspect fasteners for rust, looseness, or cracks in the shelf material.
- Check that anchors haven’t worked loose by gently applying downward pressure at several points.
- For shelves in humid or exterior-adjacent spaces, check for swelling or warping and refinish or replace as needed.
If shelves will hold very heavy items (appliances, large book collections), consider consulting a structural professional and using blocking or full casework secured into studs.
Styling and Integrating Floating Shelves Into Room Design
Spacing, Balance, and Visual Weight Guidelines
Styling is how built-in shelves feel finished rather than merely functional. We apply a few balancing rules:
- Group items in odd numbers (3 or 5) for a natural look.
- Alternate vertical and horizontal elements, books stacked horizontally create platforms for decor.
- Keep heavier, darker items near the base shelf and lighter, airier objects above to anchor the composition visually.
Visually, shelves should relate to surrounding architecture: align the shelf ends with window frames or run a continuous shelf across a wall to create a built-in band.
Practical Tips for Organizing, Layering, and Lighting Shelves
Layering creates depth. Use a mix of books, framed photos, small plants, and sculptural objects. Leave breathing room, negative space is part of the design.
Lighting enhances the built-in effect. Consider:
- LED strip lighting under the shelf for downlighting and a professional touch.
- Small puck lights recessed into the underside for accenting objects.
- Picture lights or track spots if shelves highlight art.
We hardwire lighting into wall circuits if possible, or use hidden battery-powered strips for a no-electrician solution. Conceal wires in the backing or behind trim for a clean look.
Maintenance, Cleaning, and When To Re-Check Fasteners
Routine Care and Seasonal Inspection Checklist
Maintaining a built-in look is easy if we check periodically. Our checklist every 6–12 months:
- Wipe dust with a microfiber cloth: avoid excessive moisture on finished wood.
- Check shelf level and fastener tightness: tighten any loose screws.
- Inspect for sag or warping: note any changes in alignment or finish.
- For painted shelves, touch up scuffs promptly to maintain continuity.
Seasonal checks are especially important in climates with large humidity swings because wood can expand and contract.
When To Reinforce or Replace Floating Shelves
We reinforce shelves when we notice persistent sagging, fastener failure, or when intended use changes (e.g., repurposing a shelf to hold heavier loads). Reinforcement options include:
- Adding a hidden center bracket or support cleat.
- Replacing the shelf with a stiffer material or thicker section.
- Installing a continuous plywood backing and remounting with new fasteners into studs.
Replace shelves if they’re cracked, extensively warped, or the hardware is corroded. When in doubt, reinforce rather than risk a collapse, books and decor can be heavy, and a failed shelf means damage and extra cost.
Conclusion
Built-in-looking floating shelves are about careful planning, the right hardware, precise installation, and thoughtful finishing. We’ve covered how to choose materials, assess walls, cut and fit pieces, and install using concealed brackets, French cleats, or anchors. The finishing touches, caulking, paint feathering, trim returns, and lighting, transform a practical shelf into a convincing architectural detail.
If we take our time on layout and prioritize strength where it matters, the result will blend with the room like it was always part of the house. Start with one shelf as a test run if you’re uncertain, once we nail the technique, adding a series of built-in-feeling shelves across a room is straightforward and highly rewarding.